
Jewelry Resources
So how is jewelry made anyway?
There are lots of different techniques used to make jewelry from sterling silver, nickel silver and/or pewter. My favorites are some of the most basic ones. My designs and techniques are simple because I like the design and the idea behind the design to shine brightly in my work. Highlighted here is a simple handcrafted jewelry technique.
1. It starts with a sheet of silver. The sheet is usually pretty scratched, covered in finger prints, and giving no indication of how lovely it will be once it has been polished.
2. The first step is to draw the design on the metal. Generally, I carefully cut the design out of a page in my sketch book and then draw an outline of the design on the metal with a Sharpie.
3.

The jeweler’s saw is my favorite tool. A jeweler’s saw is basically a hack saw that has been shrunk. On their own, the blades are super thin, very flexible, and not at all sharp, but in a jeweler’s saw they are strong, fragile and very sharp. They break really easily.
4.
The jeweler’s saw is my favorite tool. A jeweler’s saw is basically a hack saw that has been shrunk. On their own, the blades are super thin, very flexible, and not at all sharp, but in a jeweler’s saw they are strong, fragile and very sharp. They break really easily.
5.

When you get good at sawing you can make the blade “sing”; you can hear that you are using the right pressure.
6.
The next step is to drill the hole for the bail (a bail is the jewelry name for the thing that connects the pendant to the chain). I start by using an old ice pick to tap a mark into the metal where I want the hole. I am sure there is some fancy and expensive jewelry tool for this task, but I love thinking of my sweet grandma each time I use her ice pick.
7.
I have a fancy drill that looks and sounds (and essentially is) like the tool your dentist uses to clean and drill teeth. It does many things, but it works admirably well for drilling holes. It is operated by a foot pedal so that I can use one hand to hold the piece of metal and one hand to hold the drill.
8.
So now my piece is pretty well formed, but it sure does not look very pretty. The first step is to file away any sharp places and make sure that the lines look just like I want them to. I use a metal file.
9.
So now it is ready to polish!
10.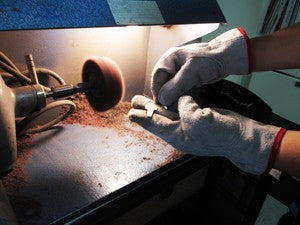
Polishing is messy and my least favorite part of jewelry making. I wear gloves because the friction of the metal against the spinning wheel creates lots of heat. There are lots of different kinds polishing wheels that create different finishes on the metal. For this piece I have chosen a brushed finish. It gives the piece a brushed, stainless steel look. 3M makes a great wheel for this look.
11.
Now the cross is starting to look pretty. I attach a bail through the hole that I drilled
12.
The bail is closed with a pair of pliers. I have about 20 on my jewelry desk or sitting somewhere in the studio where I last used them. I spend a ridiculous amount of time trying to find the right pliers. The right pliers make the job easy; the wrong pliers make me very frustrated.
13.
Then the piece goes on a chain. My daughter took these photographs so I thought it only fair that she could choose the chain. She picked an 18” steel ball chain.
14.
The Photographer proudly models the necklace.